
We’ve all seen lot before: online videos audio quality is too poor that it becomes difficult to pay attention of viewers to the speakers or information presented. When recording a video presentation or preparing for a webinar, many people spend most of their effort making sure the video is perfect, and tend to overlook simple audio settings that can make or break the quality of a recording.
Good audio quality is a critical component in ensuring your viewers stay engaged and don’t miss any part of your presentation. High-quality audio also improves the accuracy of speech search within your videos, making it easier for viewers to find and fast-forward to precise words or phrases mentioned by a speaker. Here are 5 simple tips that can make sure the audio in your presentation recordings are as clear and easy to hear as possible.
1. Choose the audio recording equipment.
In many cases, your laptop’s onboard microphone or the microphone on your webcam will be sufficient if you’re recording in a small room with little ambient noise. On the other hand, if you’re in a conference or auditorium setting, you may want to consider using a uni-directional microphone. A uni-directional microphone ensures that only the sound from one direction will be picked up. By contrast, an omnidirectional microphone will pick up sounds from all directions — which would capture distracting sounds from other people in a classroom or a common work area.
These Two of our favorite microphones are the Boya BY M1 Lavalier Microphone
and the Sony ECM-AW3. Both of these mics offer great sound quality at an affordable price. If you’re using Panopto, our broad device support ensures that whichever microphone you choose, all you need to do is plug it in. We take care of the rest.
and the Sony ECM-AW3. Both of these mics offer great sound quality at an affordable price. If you’re using Panopto, our broad device support ensures that whichever microphone you choose, all you need to do is plug it in. We take care of the rest.
- -

My favorite microphones are the Boya BY M1 Lavalier Microphone.
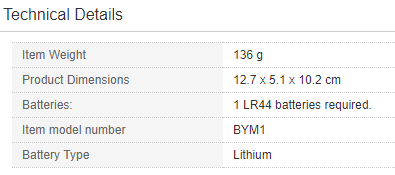
OMNIDIRECTIONAL LAVALIER CONDENSER MICROPHONE
BOYA BY-M1 is an Omnidirectional lavalier microphone, designed for Smartphones, DSLR, Camcorders, Audio recorders PC etc, it is perfect for video use. With Omni pickup pattern, for full 360' coverage, it absolutely gives you the possibility to capture anything in your sight. Super sound for presentations and video audio recorders.
- Clip-On Mic
- High-quality condenser
- Audio Cable: 20ft
- Frequency Range: 65Hz ~ 18KHz.
2. Keep an eye on your input volume.
To make sure that you’re recording at the right volume levels, it’s important that you pay attention to the input volume meter in your recorder. If you’re using the Panopto software for Windows, the input volume is on the right side of the screen; if you’re using our software for Mac, the input volume can be found near the bottom of the recording window.

3. Don’t forget to sound check!
Although this step may seem to be a no-brainer, it’s one that many people miss. When you’ve finished setting up your presentation recording area and are almost ready to start, take a few minutes out to make a quick test video. It doesn’t have to be complicated — simply record yourself saying a few brief words. Once you’ve completed your test recording, Panopto will automatically upload it into your organization’s video library, where you can play it back to make sure that your audio and video quality are exactly as you want it. Making a test recording gives you the opportunity to make any necessary quick adjustments before you record your actual video, sparing you from any surprises in your final recording.
If you’re interested in learning more about Digital Marketing/Digital Skill then my YouTube Channel can help you improve e-learning on Skill and help to communicat with your business Client Subscribe My Channel for a free
Fantastic blog you have here. You’ll discover me looking at your stuff often. Saved! Fort Lauderdale videographer
ReplyDelete